Selenium Web Component
How to Maximize Chrome Window in Selenium Webdriver using Java
Run Selenium Tests on real Chrome Browser and Devices for a first hand user like experience
How to Maximize Chrome Window in Selenium Webdriver using Java
When browser windows are maximized, it reduces the chances of Selenium scripts missing out on web elements they must interact with during automated tests. It is possible that certain elements may not be visible to or recognized by Selenium if the browser window is not in a maximized state.
Maximizing a browser window at first also provides better visibility to the QAs for the test cases being executed. Thus QAs must consider maximizing the browser window as a best practice.
As Chrome is the most widely used browser, this article will explore two simple ways to maximize a Chrome window in Selenium Webdriver using Java.
1. Use the maximize() method from WebDriver.Window Interface
The code snippet below implements four basic scenarios:
Launching the Chrome browser
Navigating to the desired URL
Maximizing the Chrome Window
Terminating the browser
Code:
 import org.openqa.selenium.WebDriver;
 import org.openqa.selenium.chrome.ChromeDriver;

 public class Max {

 public static void main(String args[]) throws InterruptedException
 {
 System.setProperty("<Path of the ChromeDriver>");
 WebDriver driver = new ChromeDriver();

 // Navigate to a website
 driver.get("https://www.browserstack.com/");

 //Mazimize current window
 driver.manage().window().maximize();

 //Delay execution for 5 seconds to view the maximize operation
 Thread.sleep(5000);

 //Close the browser
 driver.quit();
 }
 }
Successful execution of the selenium script above will do the following: launch the Chrome browser, navigate to maximize the Chrome Window, and wait for five seconds.
Code:
 import org.openqa.selenium.WebDriver;
 import org.openqa.selenium.chrome.ChromeDriver;

 public class Max {

 public static void main(String args[]) throws InterruptedException
 {

 System.setProperty("<Path of the ChromeDriver>");

 ChromeOptions options = new ChromeOptions();
 options.addArguments("start-maximized");

 WebDriver driver = new ChromeDriver(options);

 // Navigate to a website
 driver.get("https://www.browserstack.com/")

 //Close the browser
 driver.quit();
 }
 }
Successful execution of the script above will do the following: launch the Chrome browser in maximized mode and navigate to the Browserstack website.
Drag and Drop in Selenium
What is Drag and Drop Action?
This is an action performed with a mouse when a user moves (drags) a web element and then places (drops) it into an alternate area.
E.g. This is a very common action used in Windows Explorer while moving any file from one folder to another. Here, the user selects any file in the folder, drags it to the desired folder and just drops it.
In Gmail, a file can be just dragged and dropped in new mail to send as an attachment like below:
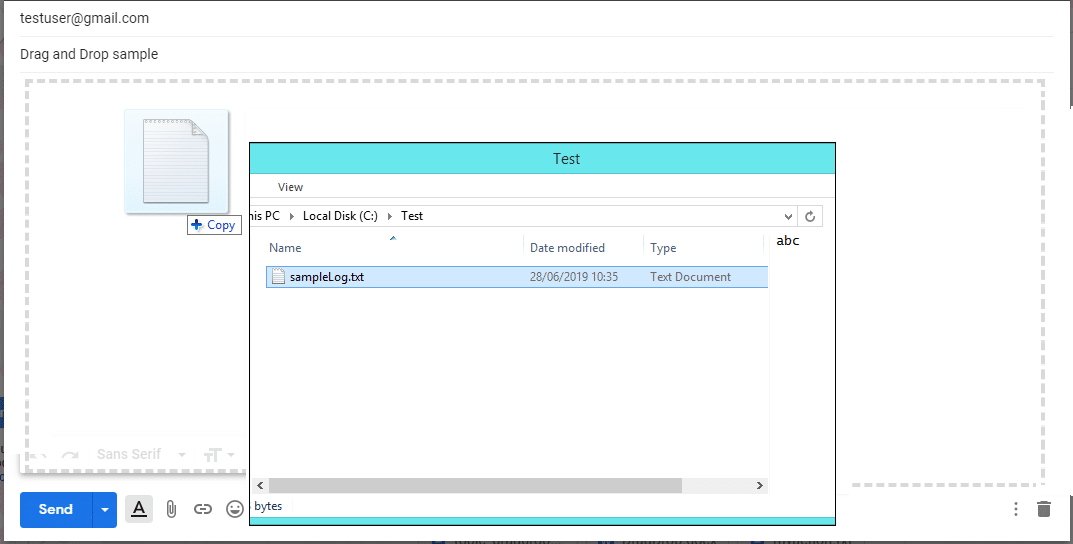
Once the file is moved to compose an email, you can see it as an attachment. At the bottom, it is displayed that the file we dragged from windows to Gmail, is now attached as an attachment.

In automation test scripts at various instances, the same action needs to be emulated:
- Select some element on the web page, drag it and then place it on the alternate area.
To perform the drag-drop action through a Selenium script, there is no direct drag-drop method available in WebElement interface. Unlike other commands like click(), sendKeys() there is nothing available for drag and drop. Here, we leverage the Actions class
which provides various methods of emulating such complex interactions.
So, here are the methods Actions class provides for Drag-Drop action:
dragAndDrop(WebElementsource*, WebElement target)*
dragAndDropBy*(WebElementsource, int xOffset, int yOffset)*
Drag and Drop in Selenium
dragAndDrop(WebElement source, WebElement target): This method performs left click, hold the click to hold the source element, moves to the location of the target element and then releases the mouse click.
Let’s see how to use Action class methods to perform drag-drop action:
First, instantiate an Actions class:
Actions actions = new Actions(driver);
As you can see, the dragAndDrop(WebElement source, WebElement target) method has two arguments to pass. One is a source web element and another is target web element. This source web element is any web element that needs to be dragged. Target web element is any web element on which dragged object needs to be placed or dropped. To find the source and target element use the below command:
WebElement source = driver.findElement(Any By strategy & locator);
WebElement target = driver.findElement(Any By strategy & locator);
Here, you can use any By strategy to locate the WebElement like find element by its id, name attribute, etc. To know more about all By strategies.
Now, when we have got the actions class object and the element as well, just invoke perform() method for the drag & drop:
actions.dragAndDrop(source,target).perform();
Let’s see what happens internally when invoke the perform() method above:
Click And Hold Action: dragAndDrop() method first performs click-and-hold at the location of the source element
Move Mouse Action: Then source element gets moved to the location of the target element
Button Release Action: Finally, it releases the mouse
Build: build() method is used to generate a composite action containing all actions. But if you observe, we have not invoked it in our above command. The build is executed in the perform method internally
Perform: perform() method performs the actions we have specified. But before that, it internally invokes build() method first. After the build, the action is performed.
1. Setup MongoDB:
Install MongoDB on your system or use a cloud-based MongoDB service like MongoDB Atlas.
Make sure MongoDB is running and accessible.
2. Setup Backend (Node.js with Express.js):
Create a new directory for your backend (e.g.,
backend) and navigate into it.Initialize a Node.js project using
npm init -y.Install necessary dependencies by running
npm install express mongoose bcryptjs jsonwebtoken cors.Create the project structure as described earlier.
Implement the backend code (
server.js,User.js,auth.js) according to the provided code snippets.
3. Setup Frontend (React.js):
Create a new directory for your frontend (e.g.,
frontend) and navigate into it.Initialize a React.js project using
npx create-react-app .(assuming you’re already inside thefrontenddirectory).Install necessary dependencies by running
npm install axios react-router-dom.Create the project structure as described earlier.
Implement the frontend code (
Login.js,App.js) according to the provided code snippets.
You should also learn to Build a Search Component in React.
4. Connect Backend with Frontend:
In
Login.js, update the API URL in the Axios request to match your backend server URL (e.g.,http://localhost:5000/api/auth/login).Ensure that the backend server is running when you make requests from the front end.
Also Explore: Interaction Between Frontend and Backend: Important Process That You Should Know
Now, let’s actually start implementing it and look at the coding part:
For the Backend Part:
Let’s look at the coding part for the backend implementation:
1. Setup Project Structure:
            /backend

              |- package.json

              |- server.js

              |- /models

                |- User.js

              |- /routes

                |- auth.js
2. Install Dependencies:
npm install express mongoose bcryptjs jsonwebtoken cors
3. Create server.js:
            const express = require('express');

            const mongoose = require('mongoose');

            const cors = require('cors');

            const bodyParser = require('body-parser');

            const authRoutes = require('./routes/auth');

            const app = express();

            app.use(cors());

            app.use(bodyParser.json());

            mongoose.connect('mongodb://localhost:27017/mern_login', {

                useNewUrlParser: true,

                useUnifiedTopology: true,

            });

            app.use('/api/auth', authRoutes);

            const PORT = process.env.PORT || 5000;

            app.listen(PORT, () => {

                console.log(`Server is running on port ${PORT}`);

            });
4. Create User.js in /models directory:
            const mongoose = require('mongoose');

            const userSchema = new mongoose.Schema({

                username: {

                    type: String,

                    required: true,

                    unique: true,

                },

                password: {

                    type: String,

                    required: true,

                },

            });

            module.exports = mongoose.model('User', userSchema);
5. Create auth.js in /routes directory:
            const express = require('express');

            const router = express.Router();

            const bcrypt = require('bcryptjs');

            const jwt = require('jsonwebtoken');

            const User = require('../models/User');

            router.post('/login', async (req, res) => {

                const { username, password } = req.body;

                try {

                    const user = await User.findOne({ username });

                    if (!user) {

                        return res.status(400).json({ message: 'Invalid username or password' });

                    }

                const isMatch = await bcrypt.compare(password, user.password);

                if (!isMatch) {

                    return res.status(400).json({ message: 'Invalid username or password' });

                }

                const token = jwt.sign({ id: user._id }, 'secretkey', { expiresIn: '1h' });

                res.json({ token });

                } catch (error) {

                console.error(error);

                res.status(500).send('Server Error');

                }

            });

            module.exports = router;
Also Read: How to Setup React Router v6?
For the Frontend Part:
Let’s look at the coding part for the frontend implementation:
1. Setup Project Structure:
            /frontend

                |- package.json

                |- /src

                    |- /components

                        |- Login.js

                    |- App.js

                    |- index.js
2. Install Dependencies:
            npx create-react-app frontend

            cd frontend

            npm install axios react-router-dom
3. Create Login.js in /src/components directory:
            import React, { useState } from 'react';

            import axios from 'axios';

                const Login = ({ history }) => {

                const [username, setUsername] = useState('');

                const [password, setPassword] = useState(''); const handleSubmit = async (e) => {

                    e.preventDefault();

                    try {

                        const response = await axios.post('http://localhost:5000/api/auth/login', {

                            username,

                            password,

                    });

                    localStorage.setItem('token', response.data.token);

                    history.push('/dashboard');

                } catch (error) {

                  console.error(error);

                }

            };

            return (

                <div>

                    <h2>Login</h2>

                    <form onSubmit={handleSubmit}>

                        <div>

                            <label>Username:</label>

                                <input type="text" value={username} onChange={(e) => setUsername(e.target.value)} />

                        </div>

                        <div>

                            <label>Password:</label>

                            <input type="password" value={password} onChange={(e) => setPassword(e.target.value)} />

                        </div>

                        <button type="submit">Login</button>

                     </form>

                 </div>

                );

            };

            export default Login;
4. Modify App.js in /src directory:
            import React from 'react';

            import { BrowserRouter as Router, Route, Switch } from 'react-router-dom';

            import Login from './components/Login';

            function App() {

                return (

                    <Router>

                        <div className="App">

                            <Switch>

                                <Route exact path="/" component={Login} />

                             </Switch>

                        </div>

                    </Router>

                );

            }
5. Run the Application:
Start MongoDB server.
Run the backend server:
node server.jsinside the/backenddirectory.Run the frontend server:
npm startinside the/frontenddirectory.Open your web browser and navigate to
http://localhost:3000to access the login page.Test the login functionality by entering valid and invalid credentials.